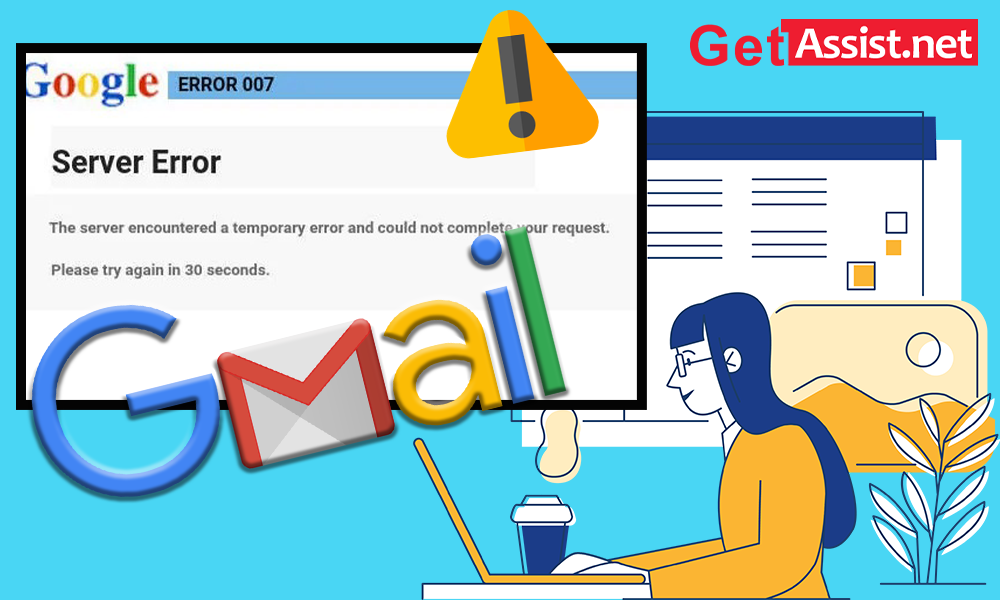
Are you here due to an email problem that says– “oops the system encountered a problem (#2014)” or did you encounter “Email Error 2013”?
If so, then, you are on the right track. Let’s walk you through an easy-to-use path that will help you to continue working, in case, you got stuck with “oops the system encountered a problem (#2014)”
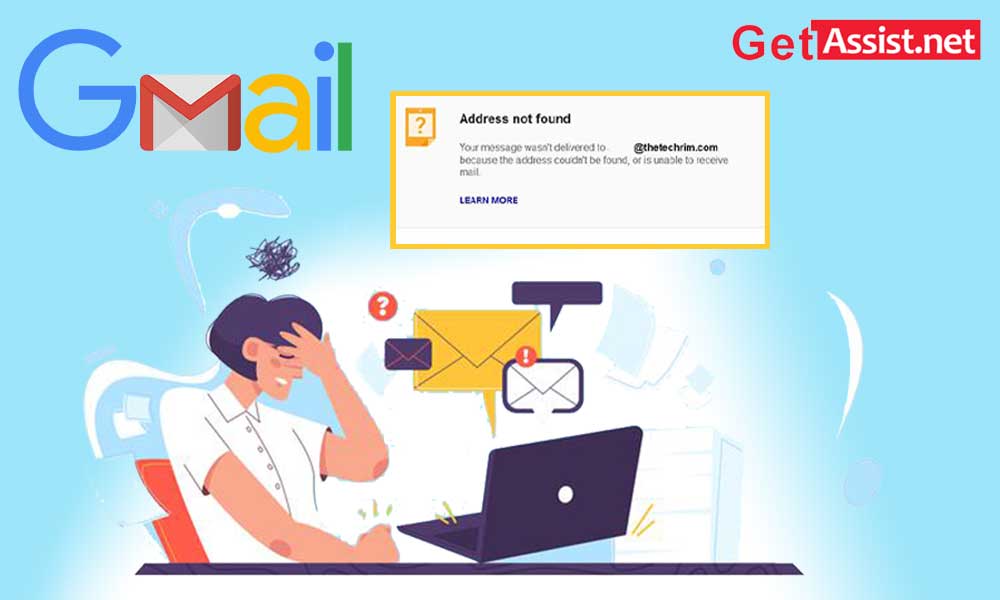
Let’s have a glance at the major troubles that you might go through which will indicate that you are stuck with a Gmail error, “oops the system encountered a problem (#2014)”
Now, to come out of the above-listed problems that you will face under Gmail Error 2014, let’s follow the methods or solutions listed below.
Your outdated versions of Web Browsers can be at the fault, causing Gmail Errors #2014, or 2013. To resolve these issues, caused by a long-lost Web Browser, just follow the steps below for fresh updates.
Step 1: Open your Web Browser through Google Chrome and click on the three vertical dots on top-right.
Step 2: Choose the Help option and click on ‘About Google Chrome
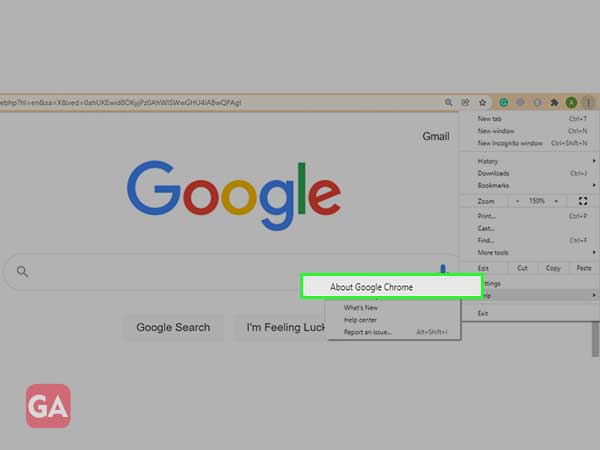
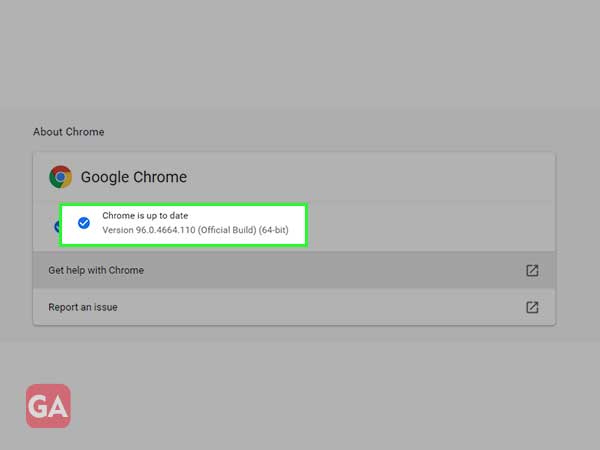
Step 3: From the About Google Chrome section, check for the Google Chrome updates, and it will be downloaded automatically.
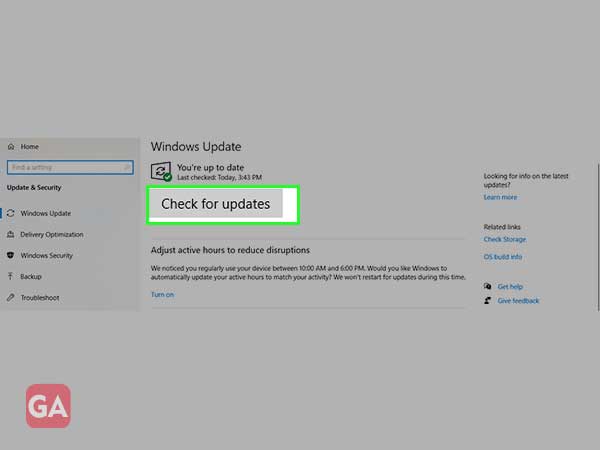
Step 1: Go to Windows Menu, and click on the Settings tab
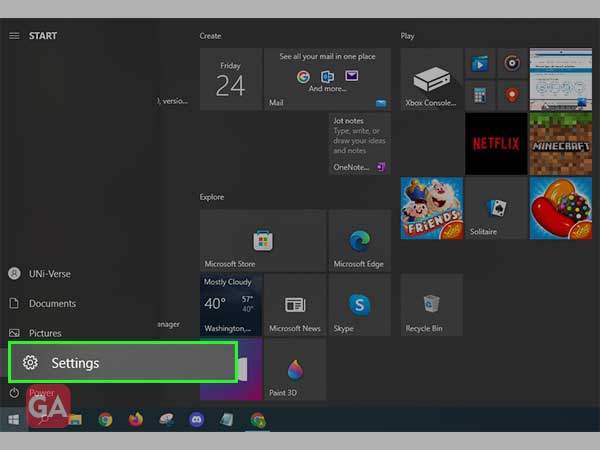
Step 2: Type updates in the Search tab and click on Check for Updates
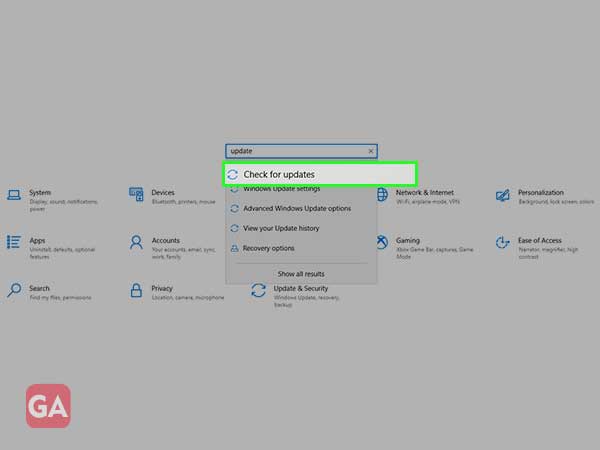
Step 3: Now, from this Windows Update section, click on Check for Updates tab, as shown below.
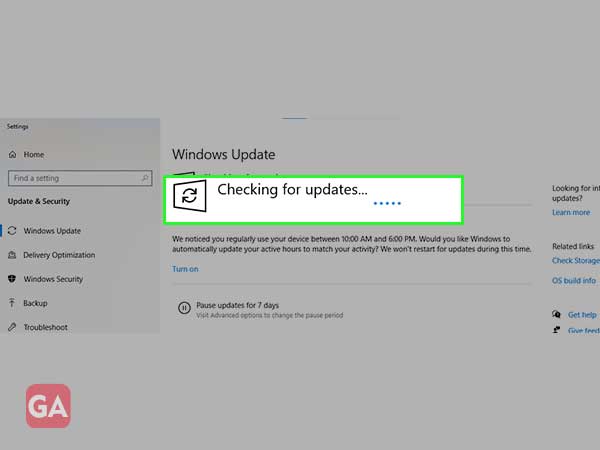
Step 4: You will see the following screen, regarding the status, “checking for updates”. And afterward, you will be directed to the required downloads and installations.
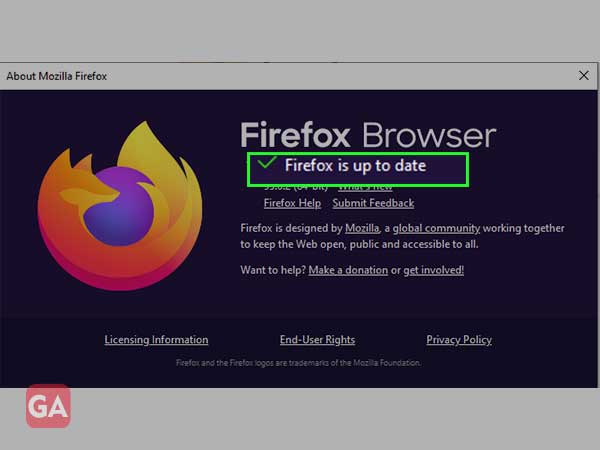
Step 1: Open Mozilla Firefox, click on the three lines at the top-right, and click on Help Tab.
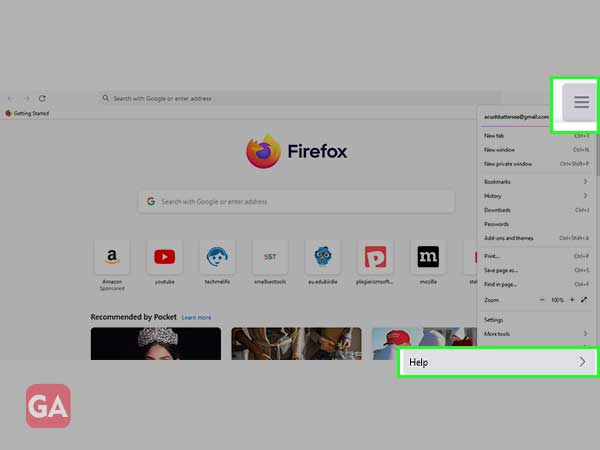
Step 2: Under Help Tab, click on About Firefox.
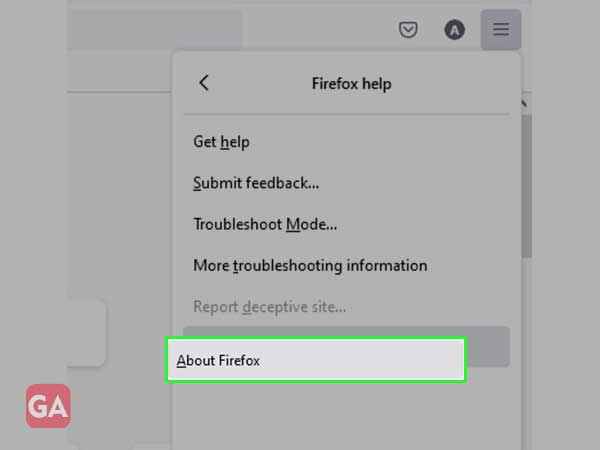
Step 3: As you see the following screen, check for updates and download and install the required updates, if necessary.
Step 1: Go to Opera Web Browser, and click on the Settings tab from the bottom left of the following screen.
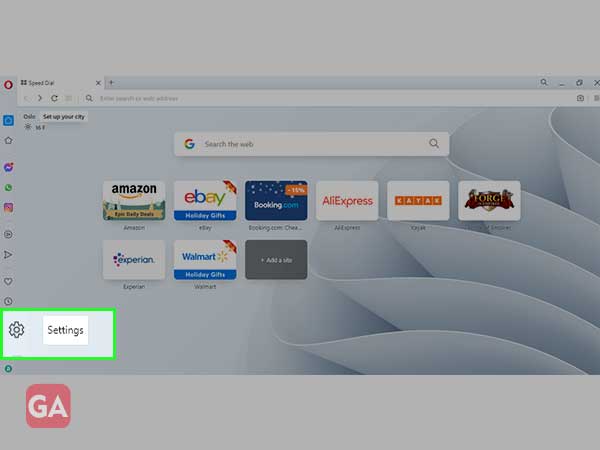
Step 2: Now under Settings, click on Opera Help
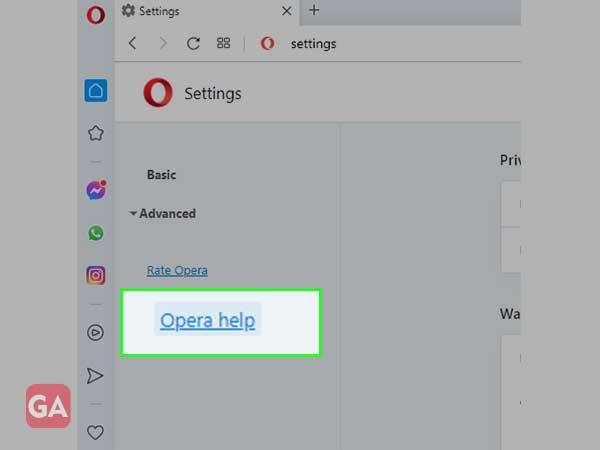
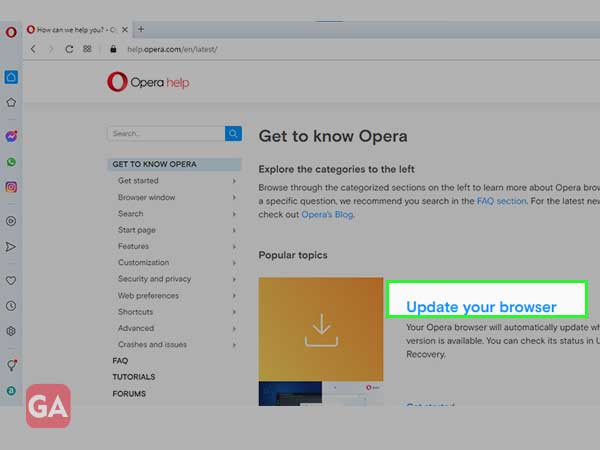
Step 3: Under Opera Help, click on “Update your Browser”. Download and install the latest updates, if found.
If you are having Gmail error #2014, due to the internet connectivity, just keep a track of the following pointers:
The add-ons or third party services can cause “Oops…the system encountered a problem (#2014)”. To disable third-party services from your device, you can use Windows Defender or Windows security status, by following the steps below:
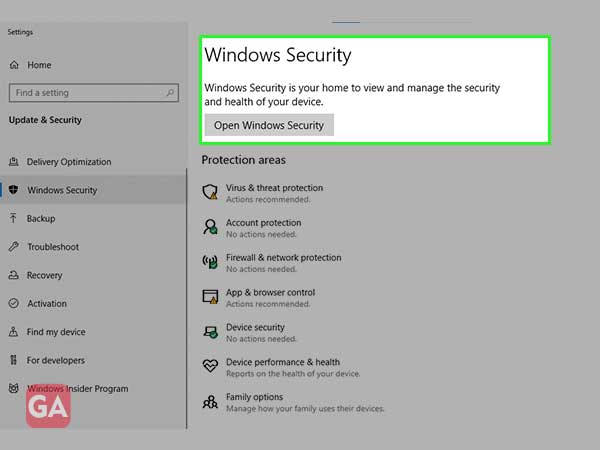
Step 1: Go to Settings, under the Windows Menu tab

Step 2: Now, under Windows Security, click on Open Windows Security.
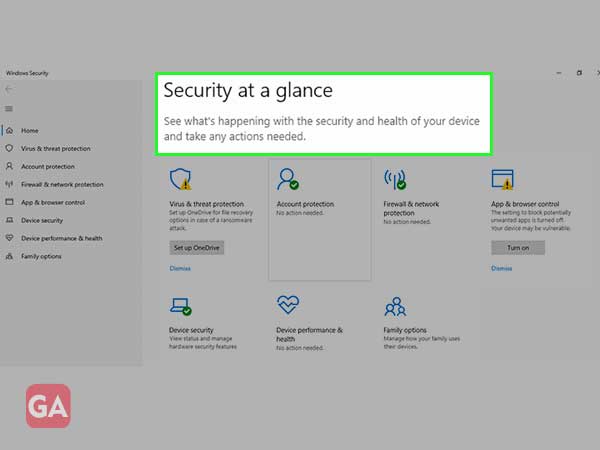
Step 3: From the Security at a Glance, check for the issues and updates. This section will direct you automatically, for the necessary checks and downloads, securely.
This might be the way out for you, as this method can also resolve some glitches in your device.
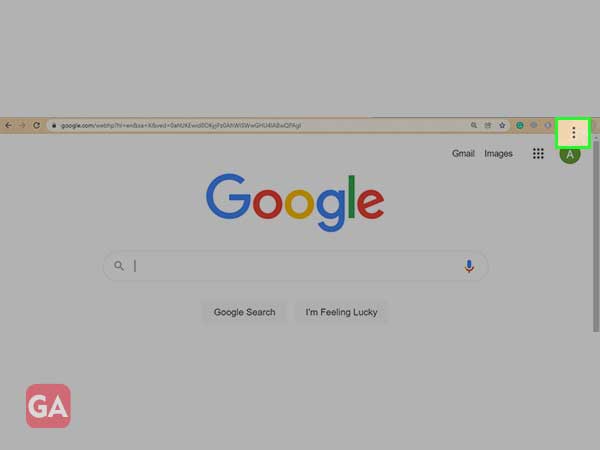
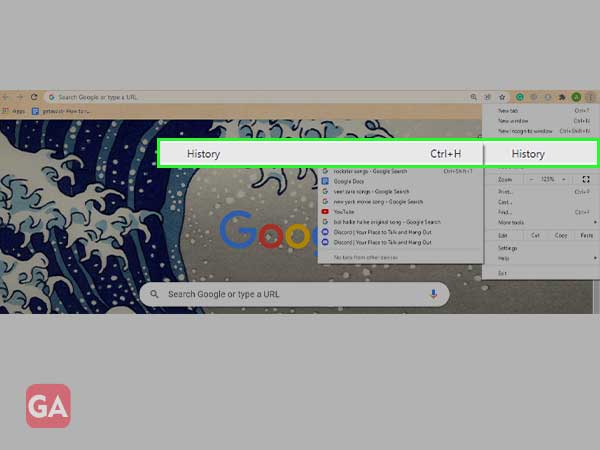
Step 1: Open Google Browser, click on History, and click on the History tab again, as shown below.
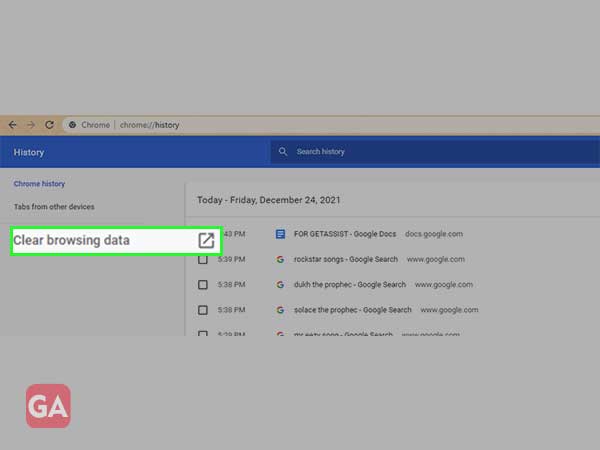
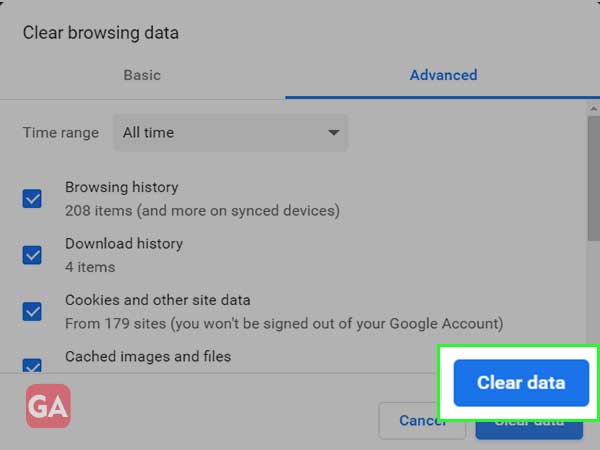
Step 2: Go to History, select the web pages you want to clear or delete and click on Clear browsing data, from the left side of the screen.
Step 3: Under the following page, after clicking on clear browsing data, choose the options to clear history, cookies, and other cache data from below and click on clear data.
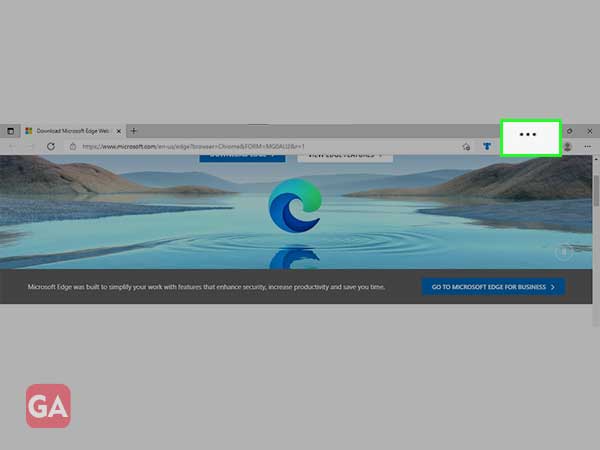
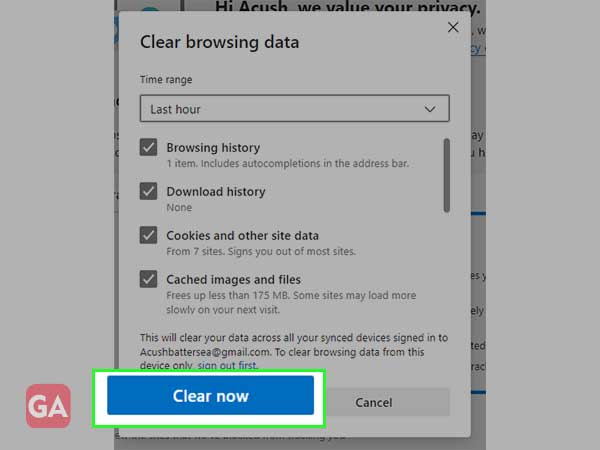
Step 1: Open Microsoft Edge, click on the three dots at the top-right, as shown below.
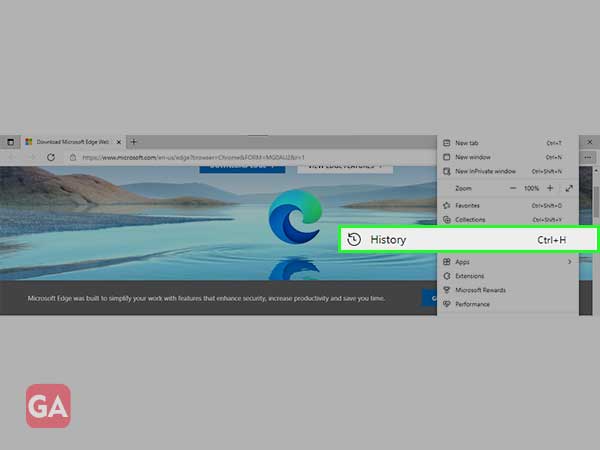
Step 2: Click on the History tab, either by tapping directly on the History tab or by clicking CTRL + H, from the keyboard.
Step 3: From the History tab, click on Clear browsing data.
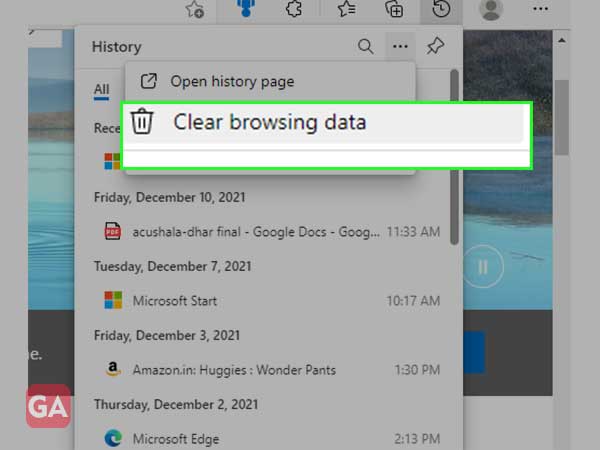
Step 4: Under Clear browsing data, choose the period you want to clear your data for, select to clean cookies, history, and other data, and click on clear now.
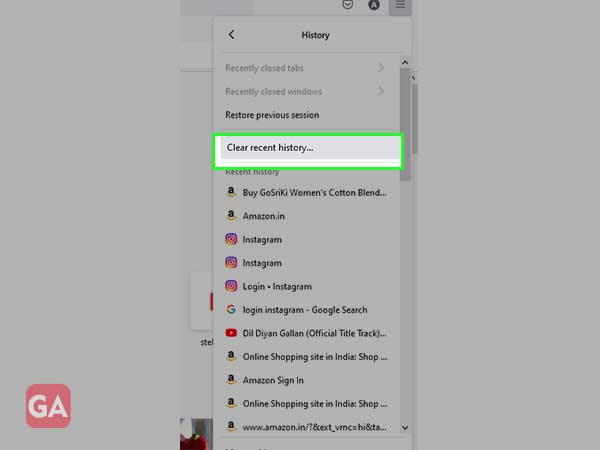
Step 1: Open your Firefox Browser, and click on the History Tab.

Step 2: Under the History tab, click on Clear Recent History
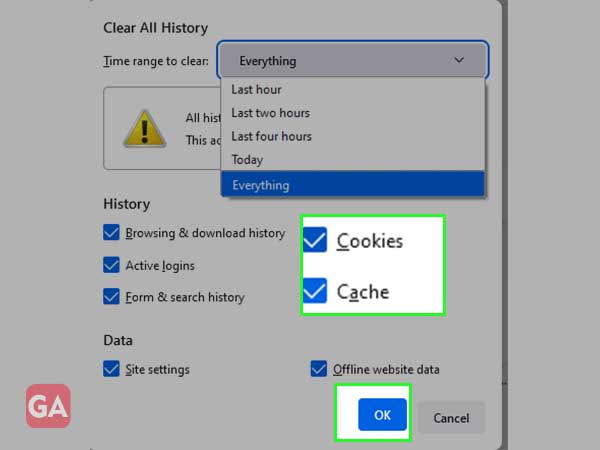
Step 3: After clicking on Clear recent History, select a time range for which you wish to clear the data, like- cookies, caches, and more. And then, click on the OK tab.
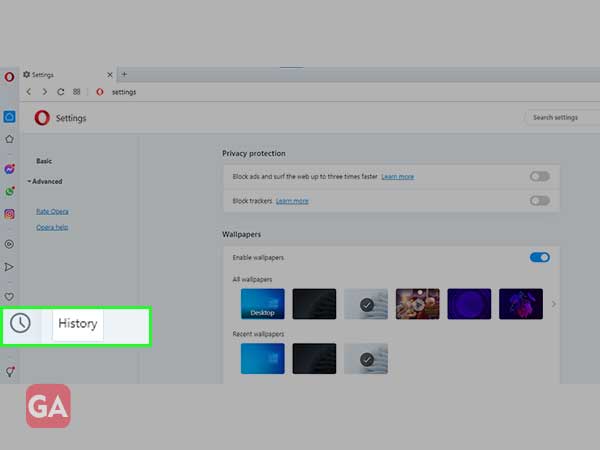
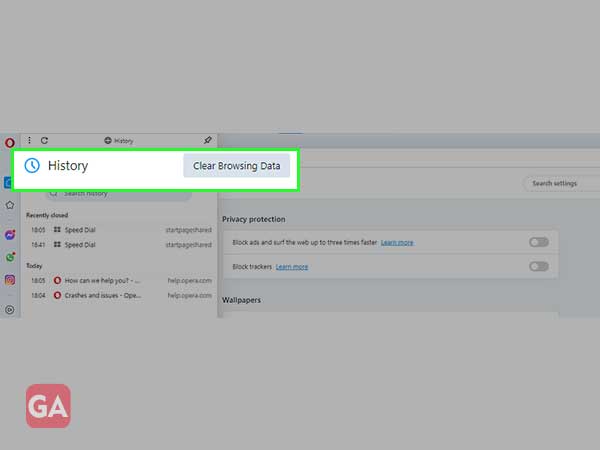
Step 1: Open Opera web browser, and click on the click icon, i.e.- History, from the left side of the screen.
Step 2: Under History, click on the Clear Browsing Data tab, as shown below.
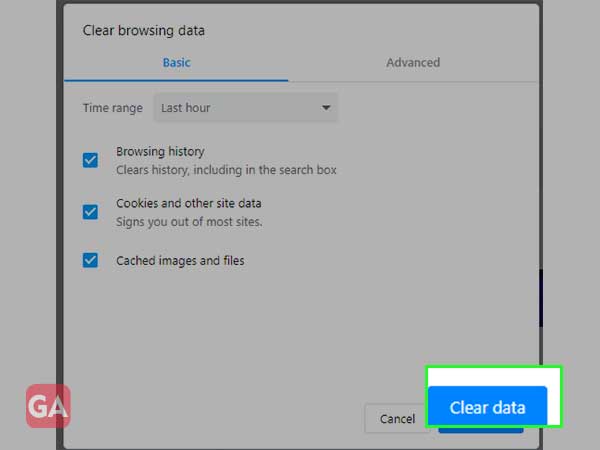
Step 3: Under Clear Browsing Data, slide to the basic section and select on Browsing history, cookies, and other site data and cached images and images section, and then click on clear data.
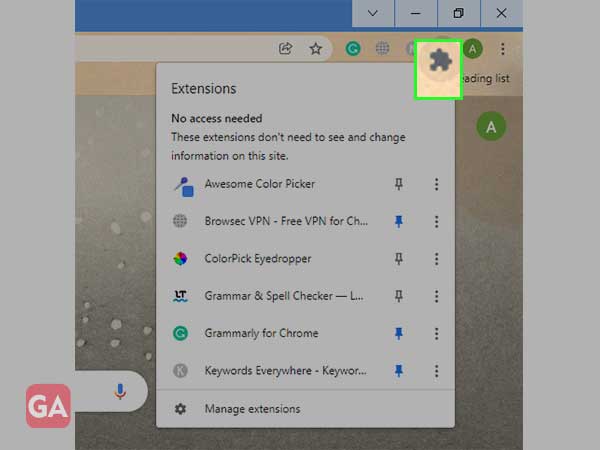
Step 1: Click on the puzzle icon (for extensions), from the top-right of your Google web browser screen.
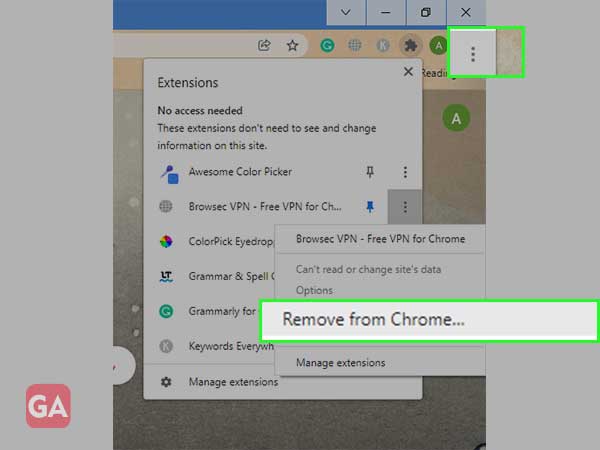
Step 2: Under the extensions, click on the three dots of the saved extensions that you are planning to remove. And afterward, click on the extension’s icon. Now, click on Remove from Chrome tab.
Step 1: Open the Microsoft Web Browser, click on the puzzle icon, from the top right of the screen.
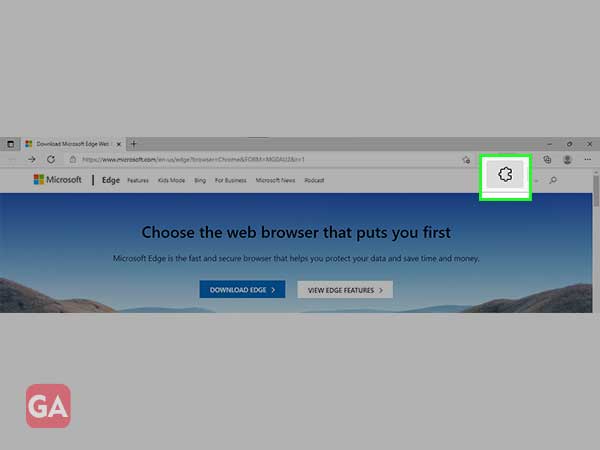
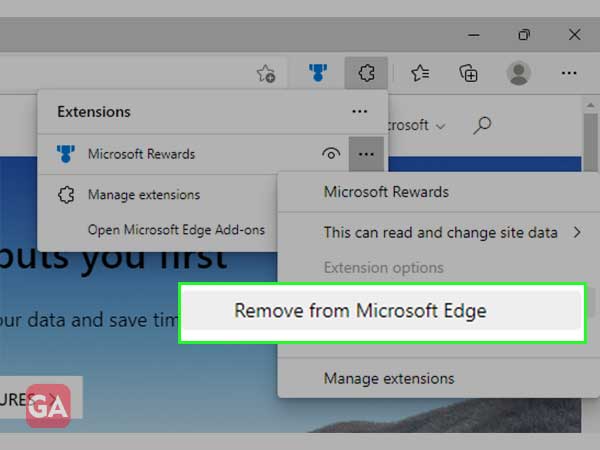
Step 2: You will be able to see all the pre-saved extensions under the extensions bar, click on the three dots on the ones that you want to remove from the browser. And afterward, click on Remove from Microsoft Edge.
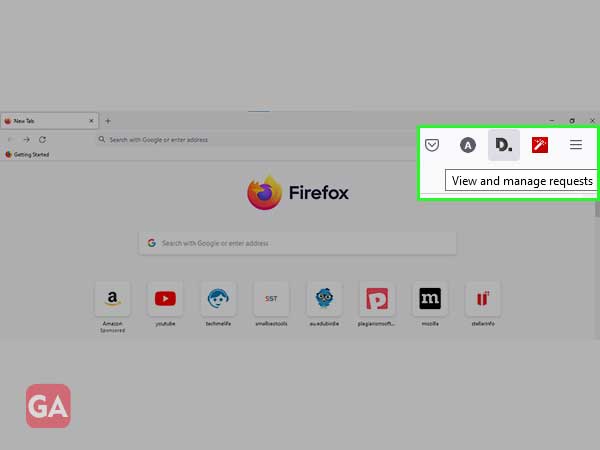
Step 1: Open Firefox browser, and click on the pre-saved extensions in the top right corner of the Firefox web screen, as shown below.
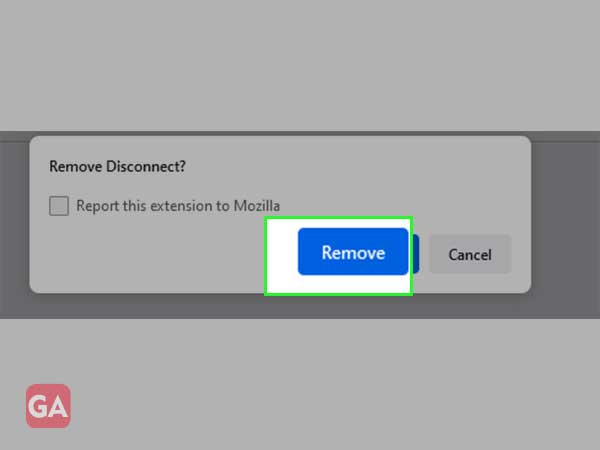
Step 2: After clicking on the saved extension icon, click on the remove extensions tab.
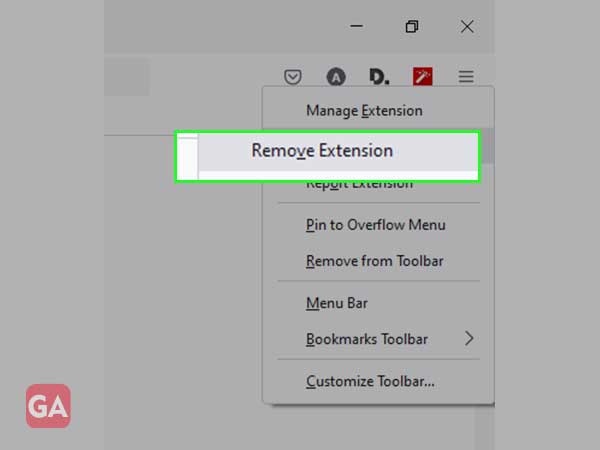
Step 3: Now, as the following screen appears, click on the remove tab.
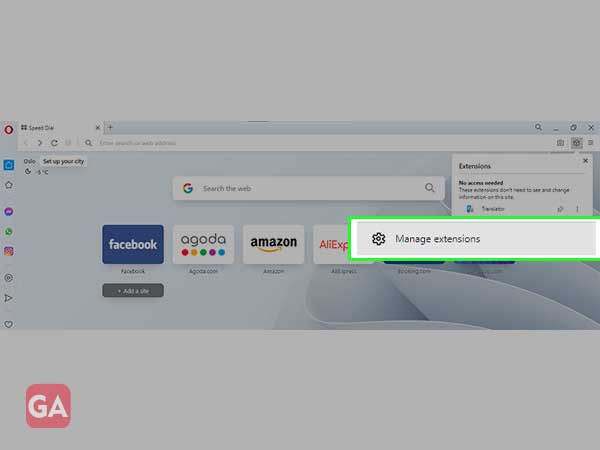
Step 1: Open Opera web browser, and click on the box icon for extensions, from the top right corner of the screen. And then, click on the Manage Extensions tab, as shown below.
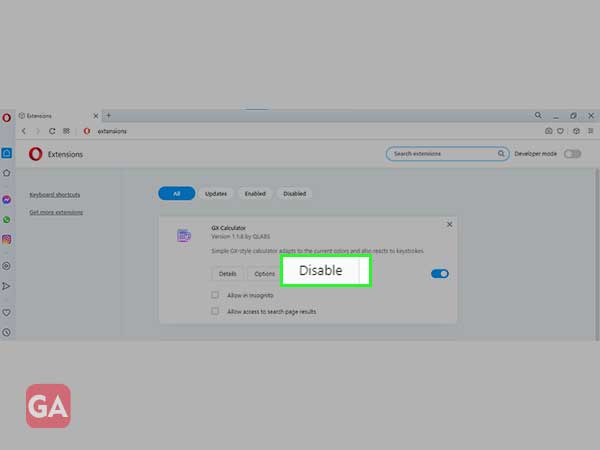
Step 2: Choose the extension you wish to remove and as you open the saved extensions, click on the disable Tab.
If the above methods didn’t work out. You should switch your latest Gmail services to the HTML version. But, before switching Gmail to HTML version, keep in mind:
Choose to switch your Gmail to the HTML Version of Gmail wisely.