Before you know why it is consuming so much of your CPU space, it is equally important to know what WmiPrvSE.exe is.
“WMI” stands for “Windows Management Instrumentation”- an important service required to run applications on your system.
Most Windows users are not aware of this process, but that doesn’t mean it is not important. Just like Wsappx process, WMI Provider Host is not something you need to think about unless it is causing high CPU usage.
WMI is a Windows feature that offers a way for software and administrative scripts to ask for information about the status of your operating system and data on it. WMI Providers offers this information about your operating system when asked for; on the Microsoft website, you will find a list of WMI providers.
This feature is mainly useful for enterprises that manage PCs centrally and even on a home PC where some software that you have installed may request information about your system with the help of the WMI interface.
WMI also helps to locate some useful information about your device that is not normally available in the Windows interface of your PC.
Wmiprvse.exe is just the executable file for the Windows Management Instrumentation Provider Service.
This service has the responsibility of performing error reporting and monitoring functions. This service is also used by some third-party apps to tie into management and monitoring services in Windows.
Generally, you will not feel the need to disable or stop the WMI service or WmiPrvSE.exe process. But there are certain circumstances where a badly written software or virus can make the service take CPU usage to really high levels; this can make Windows almost unresponsive sometimes.
Here is how you can ensure high CPU usage by WMI provider host:
On a Windows-based computer, Windows Management Instrumentation (WMI) Provider Host (WmiPrvSE.exe) process is known to use high CPU capacity (almost 100%) for several minutes every 15 to 20 minutes. Whenever this happens, you can use Task Manager to determine the process identifier (PID) of the WmiPrvSE.exe process that’s causing high CPU.
Open an elevated command prompt and run the following command:
tasklist /m wmiperfclass.dll
This will display the list of WmiPrvSE.exe processes loaded by this module. If the PID of the listed process is the same as the one displayed by Task Manager, it means you are facing high CPU usage by WMI Provider.
Although WMI Provider Host should not be using so much CPU as it is doing its job i.e. to provide the information requested by some software or script on your PC.
If there is high CPU usage, this just means that another application is also requesting data from WMI. and That’s why WmiPrvSE.exe crashes.
Also, high CPU usage is a matter of concern as WMI Provider Host is not something that needs lots of CPU resources all the time.
Here is why WMI uses so much CPU:
The handles are stored in the kernel structure \BaseNamedObjects and the WMIPerfClass Provider should scan this structure while creating the performance class concerned with the Job objects. High CPU Usage is experienced when this structure has a high number of handles and the operation will also take longer than usual.
For example, when a process is using more than about 30,000 handles, or the total number of handles on the system is more than 50,000.
This fact will affect the creation of the Process performance classes as it involves checking the memory area of each running process. The memory that is involved in the process might be divided and that will make the operation more resource-intensive as WMIPerfClass will also be asking “Costly” performance counters. You can also check if Costly performance counters are enabled by running the PowerShell command:
(gwmi -query ‘select * from meta_class’).Name | ? { $_ -match “costly”}
If you see the results by running the command, it means that Costly performance counters are enabled; for instance:
Win32_PerfFormattedData_PerfProc_FullImage_Costly
Win32_PerfRawData_PerfProc_FullImage_Costly
Win32_PerfFormattedData_PerfProc_Image_Costly
Win32_PerfRawData_PerfProc_Image_Costly
So, by now you know that it is due to the bad behavior of another process on your system that results in high CPU usage. Obviously, if a process will constantly ask for a large amount of information from WMI providers, it will cause the WMI Provider Host process to use a lot of CPU.
So that ‘other process’ is the problem; but how to identify which specific process is this. For that, you can use the Event Viewer.
Although it is possible to disable the “Windows Management Instrumentation service”, you should not do this as this can result in breaking other things on your PC. WMI is an important part of your operating system and hence should not be disabled.
Even the official description reads- “If this service is stopped, most Windows-based software will not function properly”.
So, it is better to not expand your problem by disabling this service. You just need to identify the process on your computer that is causing the error and making WMI Provider Host use so much CPU; you can update, remove, or disable that process instead.
Apart from that, you can also try these solutions listed further as that may help you in reducing excessive CPU usage:
It is possible that your device is infected with a virus or malware and that is what is causing the error. So, to ensure that your device is free from any virus, you must run an antivirus and if it detects any malicious program or application, you should completely uninstall them from your device and then restart your system.
You can also try troubleshooting in safe mode as that can also help you identify the problems:
msdt.exe -id MaintenanceDiagnostic
msdt.exe /id PerformanceDiagnostic
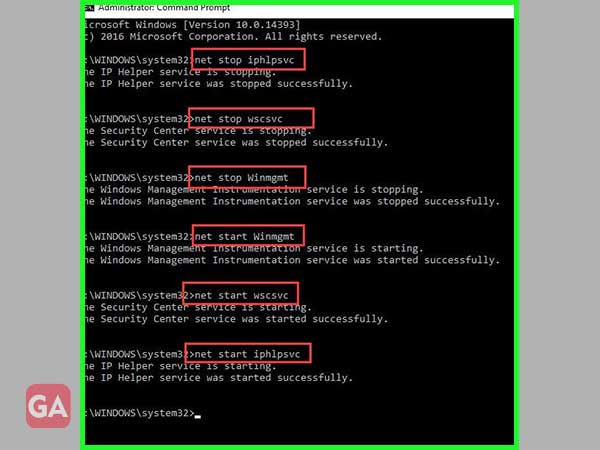
You can also restart WMI Provider Host service whenever it is consuming too much CPU resources.
net stop iphlpsvc
net stop wscsvc
net stop Winmgmt
net start Winmgmt
net start wscsvc
net start iphlpsvc
So, that’s how you can try fixing the issue with WmiPrvSE.exe and prevent it from crashing. If you still want to stop WmiPrvSE.exe from starting, which is not recommended, you can follow the information provided further.
To stop the WmiPrvSE.exe process: