Imagine you woke up late one Saturday morning. You start working out and before you begin, all you had to say to set the tone was, “Hey Siri! Play LAst dAy oN EaRTh”.
Apple products look better with the accessories, right? Everybody likes the idea of having all the accessories if they are using an iOS device, to begin with. Among these accessories, the most popular name comes as the wireless earphones aka AirPods.
Connecting the AirPods with your iPhone is as easy as it can be, but connecting them to your laptop or MacBook may seem like a big deal to many users.
If you think the same, worry not, as today’s blog will focus on how to connect AirPods with your MacBook and MacBook Pro to experience immersive excellence.
But before we move any further with the connection steps for the AirPods, let us ponder on the question of why should people opt for AirPods when there are tons of other great wireless devices available in the market?
This is one of the underrated factors of AirPods. When compared to other devices, AirPods can go up to 5 hours on a single charge, and to add to that, users can get three hours of listening time just by plugging the AirPods in the charger for a mere 15 minutes. Impressive, right?
The charging case is nothing short of brilliance as well, as it can last up to 24 hours on a single full charge. This is one of the major reasons why people who travel often prefer AirPods to anything.
For some users, pairing and unpairing devices can be exhausting, especially if you are using a new device every time. Opposite to that, AirPods users never have to worry about the same. With the inception of Apple’s very own chip for the pods, it has become much easier and more efficient for users to connect their AirPods to different devices when compared to other devices.
Simply push the button available on the case and boom, it’s done. The next time someone asks how to pair AirPods, simply direct them to our website and they will be fine.
Before we talk any further about this one, here is a little appreciation for the amazing technology that AirPods are. They are stacked with tiny batteries, a microphone, W1 chips, optical dual sensors, and accelerometers. All this along with the sensors makes sure to detect how the AirPods are being used.
One of the smoothest things about the AirPods is that the sensors detect everything. For instance, if somebody walks up to you and you take an AirPods out of the ear, the music will be paused. In the case of a single AirPods being used, the mode would simply change from stereo to mono.
As soon as you have paired your AirPods with your iPhone, they can be used across all Apple devices that you own. This iCloud feature certainly puts the AirPods at an advantage in comparison to the other wireless devices.
Machine learning and AI are without a doubt taking over the modern world. Safe to say that having access to the two wouldn’t be of any harm. Having in-ear accessibility simply allows users to carry out a wide number of tasks without even having to touch the device at all.
This includes keeping an eye on the weather, lowering the volume, asking for directions via maps, calling someone, and many other things. Once Siri gets activated, users can make the most out of AirPods to carry out all these tasks in an instant.
It comes as a great advantage for people who work from home, since they don’t have to worry about carrying their devices with them all around the place.
Additionally, the AirPods are also compatible with Android devices, so having a non iOS device isn’t a problem at all.
Let us now get to know how to connect AirPods to MacBook with the use of the steps mentioned below.
| Turn on Bluetooth<open case lid<press reset<select AirPods from device list< connect |
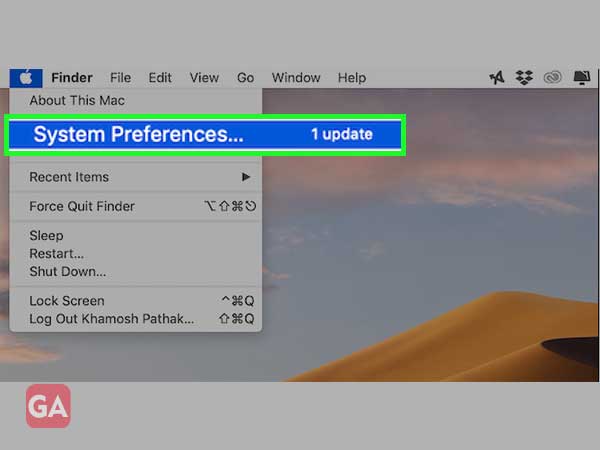
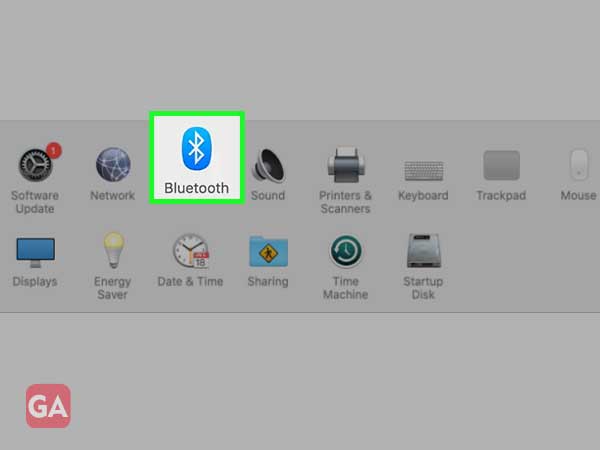
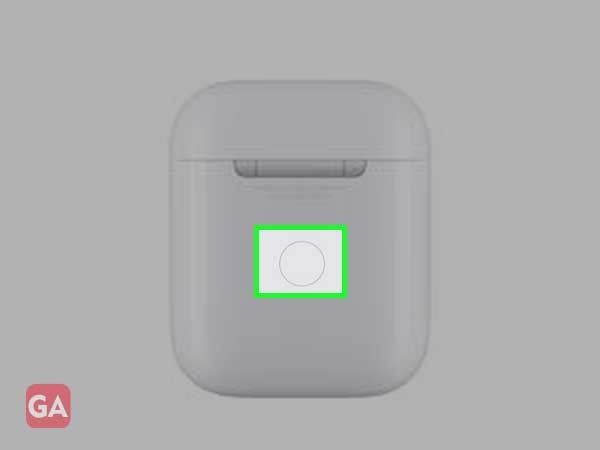
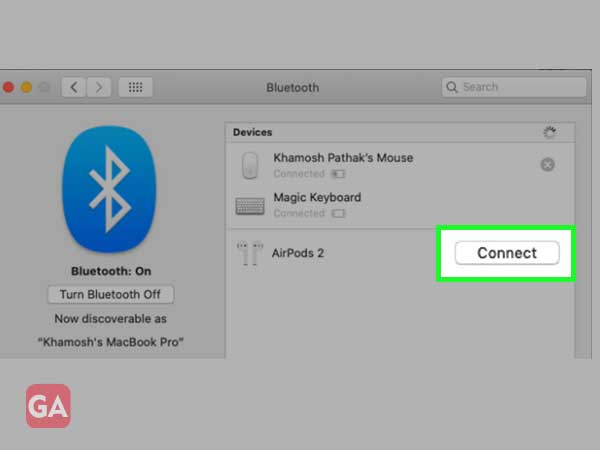
These simple steps can help users on how to pair AirPods with their MacBook, and the same process can also be used for their iPhone device.
If you are running short on time and want a seamless experience whenever you switch to your MacBook to connect your AirPods, making use of a third-party application might not be a bad idea. For just $4.99 you can have access to Tooth Fairy, one of the very first applications that were introduced to ensure a faster and more reliable connection.
Apart from this, Airbuddy is also one such application that cuts the pairing time and also lowers the number of times the pairing fails.
Now that you know how to connect your AirPods with your laptop (MacBook), let us take a look at some of the best tips that can help users to make the best possible use of their AirPods with their MacBook.
Any chance that you might be having third-generation AirPods? If yes, you are in luck, as the feature of spatial audio is going to change the way you listen to things. Thanks to the technology, you get to feel a 360 degree surround sound whenever they are watching TV, listening to songs on loop, or even when they are in a FaceTime call.
Users can simply check and activate the feature of spatial awareness by clicking on the settings option to access the Bluetooth feature. From there, click on the “I” icon and choose the option of “spatial audio”.
There aren’t many users who have complained that they ran out of battery with their AirPods, but in case you are the rare kind and use your pods all day long, chances are that they will run low on battery. To tackle this, you can simply use a single AirPods and charge the other to swap when needed. Thanks to the brilliance of Apple, the swapping remains seamless as always.
The best thing about AI is that users can experience everything with minimal effort. Siri, for instance, can directly read all the incoming messages and notifications and the user can reply to the same with a simple voice command.
The feature is turned on by default and in case you want to switch it off, simply access the settings option and click on the Siri tab to select the ‘announce messages’ feature and turn the same off.
Opposed to popular beliefs, one can only customize the AirPods with the Bluetooth settings and there is no way around it. Connect your AirPods to your respective device and access the Bluetooth settings to select the “I” icon that is available right next to your AirPods name.
Hit the name field and type the name of your preference. And just like that, the new name will be synced with all of your devices.
The option of “live listen” isn’t known to many but it is one to watch out for. You need to set it up a bit before it is accessible, but once it is done, you can simply place your device close to the person that is talking and you will receive audio notes in your AirPods.
Access the settings of your device and access the control center to select the option of “customize controls”. Hit the green symbol (+) right next to the hearing option. Finish the process by turning on the feature of “live listen”.
In case you are in possession of the latest AirPods Pro, you can capitalize on an even better feature by the name of conversation boost to use your AirPods as hearing aids.
Would be pretty cool if no one is able to access your AirPods except for you, right? Sadly, it is not possible. Although, you can get to know when others are using your pods. As soon as the user tries to connect, a message pops up stating that they are not the owner of the AirPods and if they decide to click on connect anyway, you will be able to know that someone else stole some of your listening time.
Let us take a quick peek at some commonly asked questions about AirPods on the internet.
In case you are unable to connect the AirPods to MacBook, simply try to kill the Bluetooth daemon that generally runs in the background of the operating system of your MacBook. Open a terminal window, to begin with, and type this command;
“Sudo pkill blued”. Hit enter, followed by your admin password and hit enter again. Wait for a while and try to connect your AirPods again to see if the error still exists.
Chances are that there is an issue with the audio settings of the device if you encounter such an issue. This can be fixed by settings<general<accessibility<hearing. Following these steps, one can adjust the volume slider for both left and right by keeping the slider in the middle.
That’s it from our side. We hope that this guide has all the right answers that you were looking for.