How to Allocate More Memory to Minecraft? | 7 Platforms to Release Additional RAM to the Game

| Updated on December 11, 2024

Only a true Minecraft lover knows how overwhelming it is to own a large world in the game with so many blocks, creatures, and mods. However, constructing this large world isn’t always a piece of cake, as one often faces the challenge of insufficient storage that may cause crashes and performance setbacks while playing. 

Thankfully, now, Minecraft: Java Edition allows you to add more RAM to the game without any trouble. In case you’re not aware of how to allocate more memory to Minecraft, this guide is for you. 

Here, we’ve discussed 7 different platforms that you can use to release more storage to the game and improve your performance, reduce latency when gaming, and prevent client-side game crashes. 

Use the Minecraft Default Launcher to Assign More RAM

You can simply use the Minecraft Default Launcher to issue more storage to the game, no matter whether you’re using Minecraft: Java Edition or the Vanilla Java. For this, you need to follow the given steps:

  1. First, open the Minecraft Launcher and select Minecraft: Java Edition from the left-hand sidebar, and then from the top-left corner of the page, head to the Installations tab. 
    Head to Minecraft: Java Edition >> Installations tab” class=”wp-image-83335″></figure></li></ol><ol start=
  2. Next, locate the installation to which you want to allocate more RAM.
    Locate the required installation
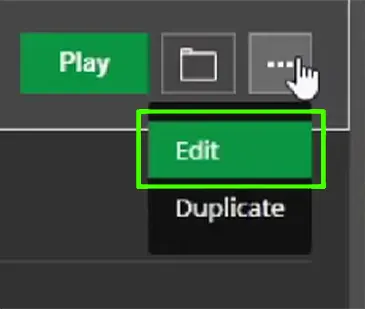
  1. Hover over it >> click on the 3 horizontal dots icon next to it. 
    Hover over the installation >> clcik on the 3 horizontal dots” class=”wp-image-83412″></figure></li></ol><ol start=
  2. Then, select the Edit option.
    Select the Edit option
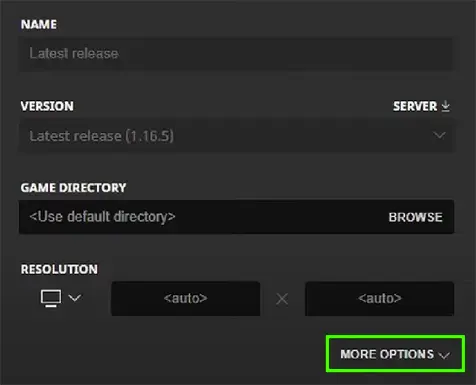
  1. Hit the More Options button. 
    Click on More Options
  1. In the JAVA ARGUMENTS text box, change the number written after the argument -Xmx to allocate the desired RAM. Here, Xmx2G = 2 GB of RAM, Xmx4G = 4 GB of RAM, and so on.
    Change the RAM value in the -Xmx argument
  1. Finally, scroll down and select the Save button from the bottom right corner of the page to apply the required changes. 
    Hit the Save button

Now, you can continue playing Minecraft with more RAM and add mods easily. 

Allocate More Memory to Minecraft Using CurseForge App

CurseForge is a desktop app that lets you download, manage, and discover modifications and add-ons for Minecraft and various other advanced video games. There are two ways for how to dedicate more RAM to Minecraft using the CurseForge App, as discussed below:

In General Settings 

Using this method, you can set the default RAM for the launcher as a general setting, and it would be applied to all profiles. Here are the steps to do it:

  1. First, open the CurseForge app and click on the gear icon from the lower left corner to open the Settings.
    Go to Settings
  1. Now, hit the Minecraft option under the Game Specific Settings from the left side panel. 
    Select Minecraft
  1. Next, scroll down to locate the Allocated Memory under the Java Settings head and use the Slider given below it to adjust the RAM.
    Under Allocated Memory adjust RAM using the Slider

To a Specific Profile

If you wonder how to allocate RAM in a Minecraft Modpack Server to a specific profile, simply head to the CurseForge app and continue with the following steps:
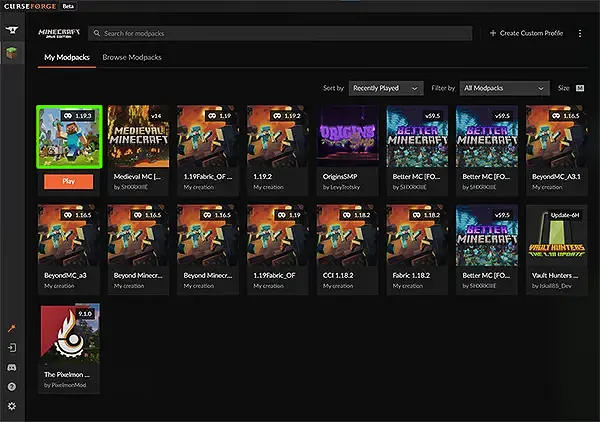
  1. Navigate to the My Modpacks section in the launcher. 
    Go to the My Modpacks
  1. From the profile tile, click anywhere (except for the Play button) on the installation you want to get.
    Click on installation
  1. Now, hit the three vertical dots icon given next to the Play button and select “Profile Options.”
    Select three vertical dots >> Profile Options” class=”wp-image-83346″></figure></li></ol><ol start=
  2. Then, uncheck the “Use System Memory Settings” box and, with the help of the slider, allocate more RAM to Minecraft.
  1. Finally, hit the Done button once the memory is released. 
    Select Done

Notes

In CurseForge, the slider represents the memory in megabytes. So, please remember 1 gigabyte = 1024 megabytes and hence, dedicate the required memory after calculating. 

Release Additional RAM to Minecraft Via VoidsWrath

VoidsWrath Launcher is another exclusive platform that solves the issue of how to allocate more memory to Minecraft. The process for the same is discussed below:

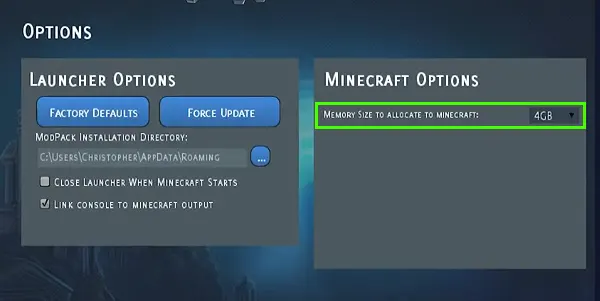
  1. Open the Void Launcher and click on the Options from the top right corner. 
    Select Options
  1. Now, tap on the memory size given in front of the “MEMORY SIZE TO ALLOCATE TO MINECRAFT” under the MINECRAFT OPTIONS head. 
    Click on the memory size
  1. Finally, select any one of the available RAM sizes as per your need.
    Select the RAM size

Once done, you can continue with installing and managing modpacks and explore various themes, challenges, and updates. To manage more space in the system, you can also use memory and storage devices.

Dedicate More Storage to Minecraft With ATLauncher

ATLauncher is a dedicated platform used to download and install Minecraft’s modpacks. It also helps you with how to assign more RAM to Minecraft quickly. There are two ways that you can opt for, including: 

For All Instances

To set the default RAM to all instances, head to the ATLauncher and continue with the given process:

  1. Click on Settings from the right sidebar.
    Head to Settings
  1. Then select Java/Minecraft from the upper tabs.
    Select Java/Minecraft
  1. Lastly, change the value of the Maximum Memory/Ram option to allocate more memory to Minecraft and hit the Save button from the bottom.
    Change the value for the Maximum Memory/Ram

Now, you can head to the Packs section from the right side panel and launch any pack with the allocated RAM without any trouble.

To an Individual Instance

Furthermore, you can also set the RAM for an individual instance as well, without affecting others. To do so, navigate to ATLauncher and follow the given steps:

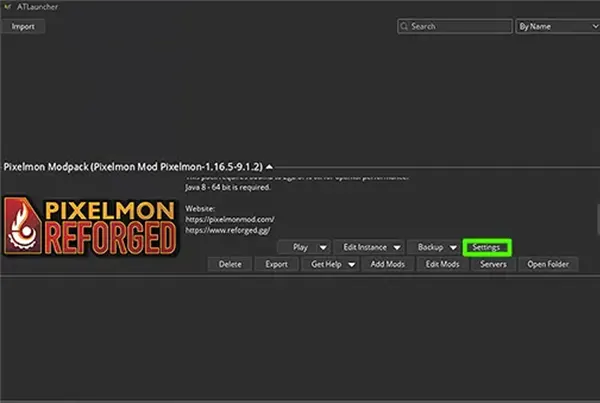
  1. From the right sidebar, head to Instances.
    Go to Instances
  1. Then, select the instance for which you want to get more RAM and click on the Settings button.
  1. Move to Java/Minecraft tab from the above.
    Switch to Java/Minecraft tab
  1. Finally, adjust the RAM in the Maximum Memory/Ram option as per your requirement and hit the Save button from the bottom.
Adjust RAM in the Maximum Memory/Ram >> hit the Save button

Notes

ATLauncher also represents the memory in megabytes so you can calculate it into gigabytes for better understanding. (1GB = 1024MB).

Use Technic Launcher for Getting Higher Memory in Minecraft Game

Another tool mainly designed for Minecraft players is Technic Launcher which allows you to install and play thousands of community-made modpacks without caring about the storage issue. It provides an easy solution for how to allow more RAM for Minecraft by following the given procedure: 

  1. Start up Technic Launcher and head to the Launcher Options from the top right corner of the screen.
    Go to Launcher Options
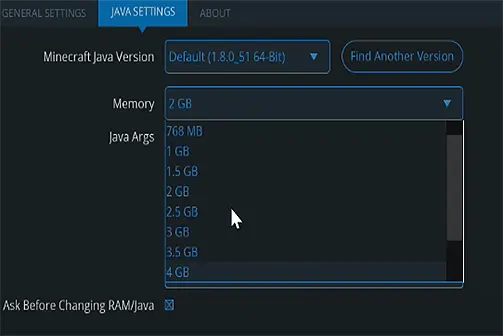
  1. Next, tap on the Java Settings tab. 
    Click on Java Settings
  1. Finally, hit the Memory drop-down and select the required RAM that you want to allocate.
Select memory drop-down >> choose the required RAM

FYI You can discover the top weekly modpacks on the Technic Launcher homepage and install them to get an unmatchable experience of Minecraft.

Assign More RAM to Minecraft by Accessing the FTB App

FTB App is free software to download and install Feed the Beast modpacks to Minecraft with no hurdles. You can deal with how to allocate more memory to Minecraft issues by using this application. For this, you need to follow the given process:

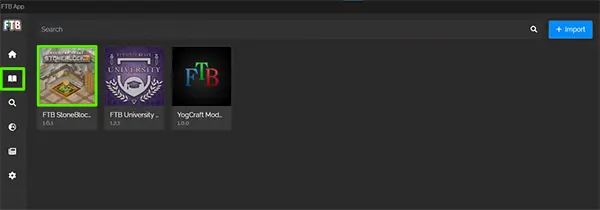
  1. First, visit the Library section of the FTB app from the left side panel.
    Head to Library section
  1. Hover over an installation and click anywhere on it, except the Play button. 
    Hover over an installation >> click on it” class=”wp-image-83367″></figure></li></ol><ol start=
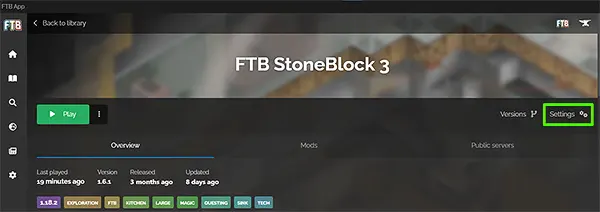
  2. Then, click on the Settings option on the next page. 
    Select Settings option
  1. Finally, move the Slider to allocate the required RAM
    Move the Slider to get more memory

Fun Fact
With the FTB App, you can also create your own Modpacks in Minecraft and share them with others. 

Play Minecraft by Allocating Memory Add-on Using MultiMC

MultiMC is a free, open-source launcher that provides a way for how to devote more RAM to Minecraft. Here is the procedure you need to follow:

  1. Open MultiMC and click on Settings from the top tab bar. 
    Click on Settings
  1. Now, switch to the Java option from the dialogue box.
    Switch to Java tab
  1. Finally, change the value for “Maximum memory allocation” and hit the OK button.
Change the value for Maximum memory allocation >> click OK

How to Check the Current Amount of RAM in Your Computer?

Before working on how to allocate more memory to Minecraft via any of the above-mentioned methods, it is necessary to first check the available memory in your computer. Because you can’t release more RAM than your system has. To check the current memory status on your system:
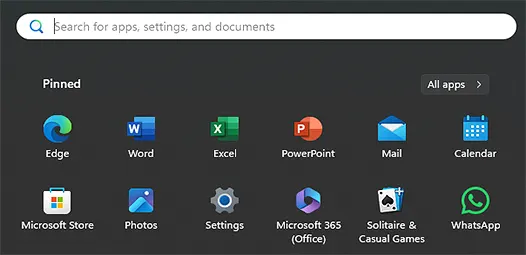
  1. Open the Start Menu by clicking the Windows key.
    Open Start Menu
  1. Type System Information in the Search Bar and select the app from the results.
    Search for System Information >> Select the app” class=”wp-image-83377″></figure></li></ol><ol start=
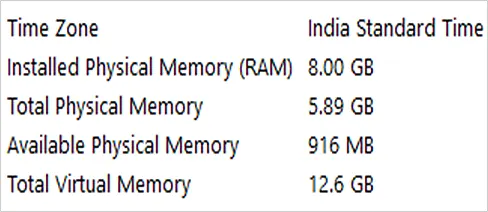
  2. Locate the Installed Physical Memory (RAM) under System Summary and check the total RAM stated next to it. 
    Check the total RAM in the Installed Physical Memory (RAM)

You can also use the Windows Task Manager to check the total RAM. For this, you need to press CTRL + ALT + DELETE >> select Task Manager >>  Performance from the Task Manager panel.

While playing Minecraft or trying to increase its RAM, you might face some potential issues, which are discussed below along with the possible solution:

Unable to Allocate More Than 2GB

Sometimes, due to installing the incorrect Java version of the game, you may encounter an allocation error. In this case, download the updated Java version >> close the launcher >> reopen it >> try again with the memory allocation. If this isn’t favorable, prefer to reinstall the client and/or profile instance on your system. 

Crashing/Lagging Issue

This is one of the most common issues with Minecraft that mainly arises due to insufficient memory. Use any of the above-discussed ways to assign more storage to the game. But remember, don’t set the RAM’s value to the maximum, as this could create some unintended troubles while playing.

That’s why it is suggested to regularly check the memory status in the game so that you won’t face interruptions while playing. 

Let’s Wrap Up!

So now you know how to allocate more memory to Minecraft and install more mods, updates, and instances. However, please note that the methods discussed here are applicable to Minecraft: Java Edition on Windows only. Minecraft: Bedrock Edition doesn’t allow you to allocate more RAM.

What are you waiting for?

Create your own large space world in Minecraft without memory trouble. 

FAQ

How can I check how much RAM is allocated to Minecraft?

For this: 

  • Open the Minecraft game >> press F3 to open a detailed overlay.
  • Under the “Mem” section in the top right corner, check the allocated RAM given in the MBs.
How much RAM should I allocate to Minecraft to play uninterruptedly?

The amount of RAM given to Minecraft depends on how you’re playing. For example, vanilla Minecraft needs around 3-5GB of RAM, while Minecraft with mods needs somewhere 5-7GB. 

How to relocate more memory to Minecraft’s instance?

First, you need to open ATLauncher >> head to Instances >> select the individual instance to which you want to assign more RAM >> click on Settings >> go to Java/Minecraft tab >> increase RAM under Maximum Memory/Ram section. 

Can allocating more RAM to Minecraft create trouble?

Yes, if you have improperly assigned more RAM to Minecraft, it may slow down your computer as the system will not have enough storage to operate other functions.


Janvi Panthri

Senior Writer, Editor


Related Posts
×