It is a pretty common scenario to accidentally or even internationally delete files you’re your Windows PC and later realize you still need them. Such scenarios are common when selecting multiple files to delete and, in the process, you unintentionally select some files you still need.
If you find yourself in this kind of situation, worry not because this article will help you figure out how to recover deleted files on your Windows 10/11 computer. We will share with you an effective step-by-step method that you can use to recover any type of file from any drive on your computer. Let’s jump right in!
Yes, there are several ways to recover deleted files, but it is much better to protect your files from being deleted in the first place. This will save you a lot of time that you may otherwise waste trying to figure out how to recover deleted files on your machine. One of the ways to protect your files is by adding passwords to some of the folders with these sensitive files using BitLocker or third-party software.
You may also protect your files by simply hiding them from being directly accessed when you open file explorer. Hidden files can only be accessed by taking some extra steps to unhide them. Having your important files hidden makes it harder to delete them accidentally because you will have to unhide them first before deleting them.
Also Read: Recovering Unsaved PowerPoint on Windows 10/11
4DDiG is one of the most reliable tools for recovering deleted files in Windows 10/11. It has an intuitive UI and several important features that make it easy to recover deleted files from any storage device. This tool can also be used to recover lost partitions on your main machine or an external drive.

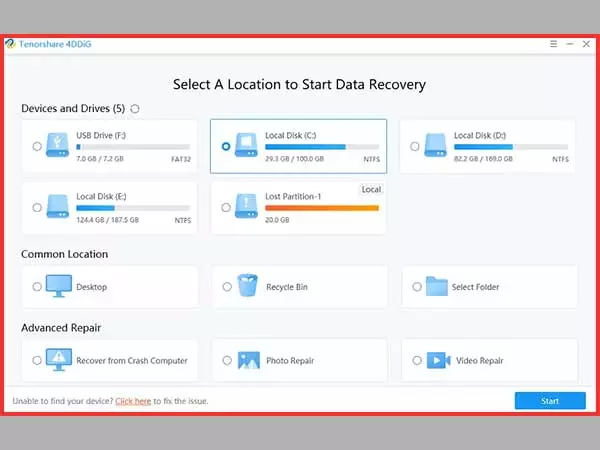
Open 4DDiG on your machine and select the drive with the files you intend to recover. When you launch 4DDiG, you will be presented with three sections; Devices & Drives, Common Position, and Advanced Repair. Under the “Devices & Drives” section, you should see the partition drive or partition with files you intend to restore. If it is an external drive make sure it is properly connected to your computer before launching 4DDiG.
After selecting your disk, 4DDiG gives you the option to choose the type of files you want the software to scan. You can choose all types if you want everything on the drive to be scanned. However, if you have specific types of files that you need, it is better to choose only those because it will reduce the time required to do the scan.
After choosing the type of files you want, click the “Scan” button to get started. 4DDiG will scan the entire drive and partition to search for all files that you selected. This process may take time depending on the amount of data on your drive and the computing power of your device.
4DDiG also gives you the option to stop or pause the scanning once you realize the files you need have been found.
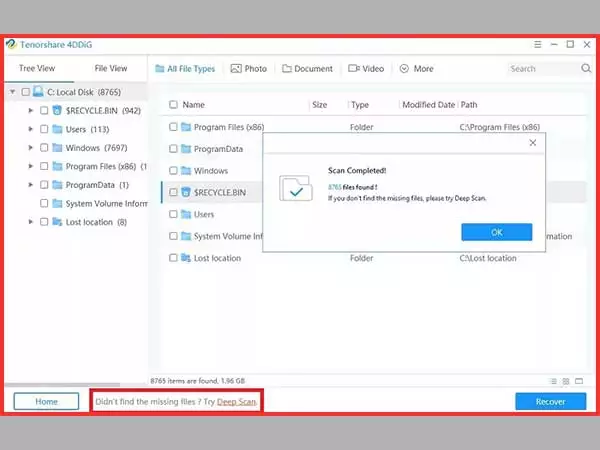
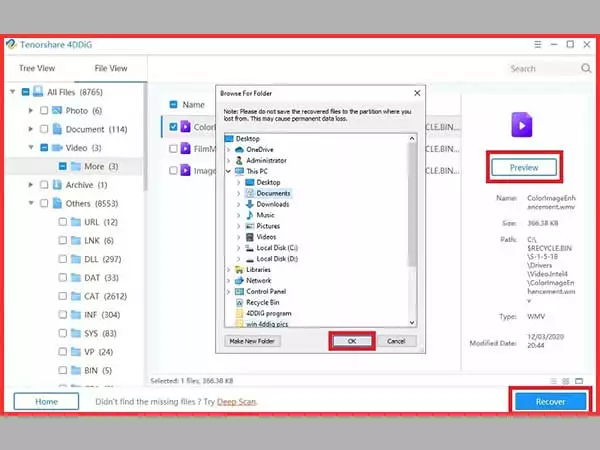
Once the scan is complete, you can now preview and select the specific files you would like to recover. Hit the “Recover” button to get started. You will be required to choose a partition where the recovered files are to be saved. Don’t choose the same partition where the lost files are located.
Once you realize some of your files have been deleted, it is recommended that you stop adding or removing files on the disk where the deleted files were stored. Using the disk with deleted files could overwrite them hence permanently deleting these files.
We hope the method we have just shared helped you recover your deleted files. For most scenarios, the quick scan option should recover the files. But if it doesn’t, take advantage of the deep scan option. You should make sure that the target drive or partition where the recovered files are being saved is big enough to accommodate them.