Your Mac hard drive has been acting differently. You may hear some screeching noises, some files seem to be corrupted or missing, and the system is extremely slow. All these symptoms indicate poor health of your hard drive, which would eventually lead to data loss or system crash. Several moving parts of a hard drive are known to degrade over years and sometimes even magnetic sectors may not work efficiently. Before any type of data loss or other issues occur, you must be able to identify the symptoms. There are several ways to identify this, but you can do it easily using Apple’s in-built tool Disk Utility. This post guides you through steps to use this function and tips to repair hard disk using two other built-in features macOS Recovery Mode and Single User Mode.
Steps to Check Drive Health Using Disk Utility
Go to Applications >> Utilities Folder>> Disk Utility.
Next, in the Disk Utility, click on View menu >> Show All Devices.
You will a list of all storage devices on your Mac on the left-hand side. The first device on the list will be the boot drive of your Mac. You can click on the arrow that appears on the left-hand side of the label. This will expand the list and you can see containers and volumes in the drive.
Choose the last item on the drive.
Hit the First Aid tab.
You will see a message “ Run First Aid on “Macintosh HD Data”, hit on Run if you wish to continue. The message also says “ First Aid will check the volume for errors. It will then repair the volume if necessary.
This process may take some time.
In case, you see a dimmed Run Drive, perhaps you cannot operate this function on the drive. Click on Cancel.
Go to the left column, repeat step 6. You can repeat this till you check all drives on that list.
The First Aid will bring you the results of the drive health. If you see the messages in black, it indicates that things are good. If the messages appear in red, then the drive requires repairing.
You will see several messages like this:
Verifying partition map for “APPLE Media”
Checking prerequisites
Checking for an EFI system partition
Checking the partition list
Checking the EFI system partition’s size
Checking all HFS data partition loader spaces
Checking the EFI system partition’s file system
Checking Core Storage Physical Volume partitions
The partition map appears to be OK
If you see the message the disk needs repair, you can click on the Repair Disk button. If the disk in question is the boot disk, then this option may not show. However, this doesn’t indicate that you cannot repair the disk. You can easily do it, however, there will be an additional step involved.
How to Use Disk Utility Function to Repair the Hard Disk
You can run the Hard Disk in all advanced systems like High Sierra, macOS Sierra, OS X Lion, Yosemite, OS X Mavericks, and so on.
Reboot your system and hold the Command +R. There is a hold own Option in many systems. You can hold it until you start seeing a spinning globe or Apple logo on the screen.
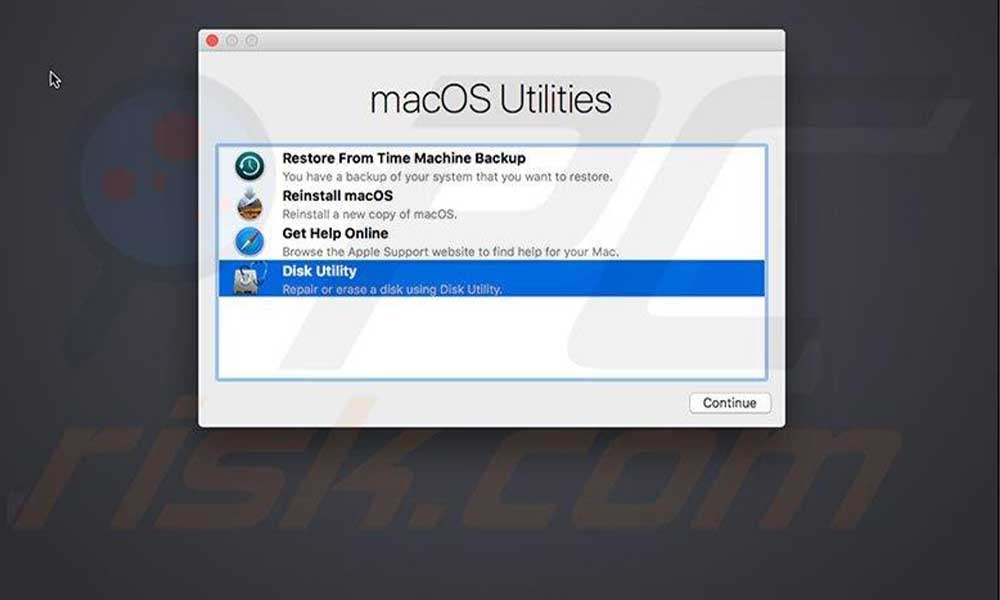
Go to the boot menu and choose “Recovery HD”.
Choose“Disk Utility” from the Mac Utilities Screen.
Click on the hard drive where the error has been reported.
Click on the tab – First Aid >>Repair Disk.
After this repair has been performed, you will be able to boot the system normally and issues of the drive will be completed.
How to Repair Hard Drive Using Single User Mode?
You can restart the Mac in the Single User Mode to repair the hard drive following these steps.
Take a backup of files and shut down the computer.
Next, press and hold Command + S to start single-user mode.
Once the mode is active, you will see white text on a black screen. This booting will take time.
When it finishes each line will appear with “localhost//”.
Type the command fsck-fy and press Return, the disk checking messages will appear on the screen.
When the process finishes, you can check the message that reads like “ The Volume Appears to be OK”. If you do not see this message, you can repeat this process until you see it.
Once you see the message, type Reboot, and hit Return and then you will exit the Single User Mode.
When the system starts, you can launch the drive through Disk Utility to ensure the drive is working fine.
If the above steps do not work and the hard drive is damaged beyond repair, then you must get in touch with your nearby Apple Store. In case, you are unable to get through the nearest store or find a certified technician, you can still recover data from crashed Mac Drive using professional data recovery for Mac software like Stellar Data Recovery Professional for Mac. This software restores data from crashed or non-booting Mac using a recovery drive. It supports the latest macOS Big Sur and other older versions. It can recover all types of files including photos, audio, videos, and more. You can download the free trial version of the software to evaluate its working before purchasing the premium version.
L. Dias William is an established writer who specializes in Apple goods, iOS, and other technology. He holds a Bachelor's degree in Computer Science from Massachusetts Institute of Technology (MIT) and has years of hands-on experience in the IT business. William has a sharp eye for detail and an enthusiasm for innovation, and he has written countless articles and reviews that are popular among computer fans throughout the world. His distinct combination of technical understanding and creative flare makes him a desirable voice in the consumer electronics industry.